I explained that there were two ways of doing it. The hard way and the easy way. I believe life is difficult enough these days so I set about designing this project the easy way. I used a PIC integrated circuit. Now before you turn the pages to read some other article, have a read of this and then you can turn the pages if it is not really what you want. Firstly, I want to emphasis that a few years ago I knew nothing about PICs or any other type of `microchip' and I didn't want to know either! My background of forty odd years, are radio, television and video. Whilst other electronic enthusiasts were developing their skills with the early computers, Commodore, Spectrums, Amigas and BBC/Acorn, I was growing up with video and home-produced video effects. I was transmitting these special effects `over the air' with my amateur television transmitting licence. I knew nothing at all about computers and would stare at a `C' prompt not knowing what do.
I am now fifty seven (November 1999) and have recently learned about these PIC chips. If I can do it with my background I am sure you can and maybe you will learn even quicker.
Look at this programme that will control two sets of traffic lights in synchronism with each other. There are two sets of LEDs each arranged with a red at the top, a yellow (amber) in the middle and a green LED at the bottom. These are placed on each side of the PIC on my prototype box.
FIG 1 Two sets of `traffic lights' positioned either side of the PIC.

The Programme written in PICBASIC/
This is the 'code' that is typed into an ASCII editor such as EDIT or any word processor as long as it is saved as a text file and not a document file.
Here is all you have to type. The text is not ' case-sensitive and can be written as, for example, High, high or HIGH.
loop:
gosub clr
high0:high6:pause5000
high0:low1:high5:low2:low6:pause1000
high0:high4:low2:low1:low5:low6:pause 1000
high0:high1:high4:low2:low5:low6:pause 1000
how0:aowl:high2:high4:low5:low6:pause5000
how2:high1:low0:high4:low5:low6:pause1000
how2:lowl:high0:high4:low5:low6:pause1000
high0:low1:low2:high4:high5:low6:pause1000
high0:low1:low2:low4:low5:high6:pause500
goto loop
clr:forbl=0to7
lowb1
nextb1
return
All that remains now is for the code to be ', compiled and converted to a HEX file that the PIC can understand. This is achieved easily with the PIC compiler that comes with the PICBASIC package. The PIC is programmed with any of the parallel or serial port programmers that are available free of charge from the NET.
Let's look at the code to explain what is happening.
These numbers refer to the port pins on the PIC. There are two of these. portA , 0 to 4, and port B 0 to 7. We are only using portB for this project.
The programme listing
Loop: Is the start of this programme. It is suitably called loop, as that is what the programme does. It loops continuously until it is switched off. It must be followed by the colon.
Gosub clr This is telling the programme to go to a sub routine (mini-programme) called Or (clear). It is there to re-set all the LEDs to off.
HighO: Places a logicl on portB pinO consequently lighting LED 0. The colon is there to separate the first statement (high 0) from the next one in the same line. If the next statement (high 6) was placed on the next line down there would be no need for the colon. It just saves space.
High6: Sets portB pin6 to a logic 1.
Pause1000 Is an instruction to tell the PIC to delay for 1 second. The actual time will depend on the clock frequency of the PIC. As a rule of thumb 1000 can be regarded as 1 second and 5000 as 5 seconds.
low1 places portB pinl at a logic low, or zero, turning that LED off. The rest of the code is the same using various pin numbers.
Gotoloop This tells the programme to go back to the beginning and do it all over again.
Clr: for b l= 0 to 7
This could have been written, to save space, as
Clr is the sub-routine to clear the LEDs. (make them all off).
Lowbl instructs that everything in register b 1 goes to logic 0. In our case all the pins in portB, 0 to 7 are taken low. It does this in sequence from pin 0 to pin 7. Hence the reason for next bL If we had put 'for b1= 0 to 3:next bl' then it would only place the portB pins 0, 1, 2 and 3 to a logic low.
Return simply tells the programme to return to the start of the sequence.
The first line of the 'main' listing (high O:high6:pause5000) is placing RED LED A on and GREEN LED B on. It then stays on for about 5 seconds and then goes to the next stage. The RED A stays on AMBER is off AMBER B is on and GREEN A and GREEN ' B is off and so the sequence continues. The ' 0.5-second pause on the last line is there to avoid errors at the return of the sequence.
Fig. 2. The complete two-traffic lights circuit. Simple isn't it! It will be obvious by looking at Fig. 2 that there is not much to the circuit. Perhaps series resistors of about 100 0 should be placed in between the ports and the LEDs to limit the current.
The programming of the PIC is very simple but you will need the necessary software. PICBASIC is available from MAPLINS and the programmer software and circuit diagrams are available free of charge off the NET. You may know someone who already has both of these types of software. The PICBASIC available free on the NET is probably a good compiler, but is a bit more involved in that you have to type in some other information as well as your programme listing. It is not as `user friendly' as the PICBASIC programmer produced by Micro Engineering Labs Inc. I had no reply either from the NET PICBASIC people when I asked for some advice.
If you do not have any means of programming or you prefer not to anyway, but would like a working set of traffic lights (you can remotely operate the LEDs) then I can supply you with a pre-programmed PIC. I can also produce a PCB and an 18-pin holder for the PIC. If anyone is interested I can just send the HEX code on receipt of a floppy disc and the return postage. The preprogrammed PICs I could supply at say £5 including P and P. the PCB and IC holder I could also send for £5 including P and P.
inlude"PBL INC."
The compiler then goes on to change rgis assembly language into hexadecimal code. I have not shown this as it appears as a block of letters and numbers and you cannot recognise any of the stages in it.
This is then downloaded into the PIC 16C84 chip.
Pinouts for the PIC 16C84 and PIC 16F84
THe PIC16F84 can be programmed as for the PIC 16C84. This is called a "flash" equivalent of the PIC 16C84.
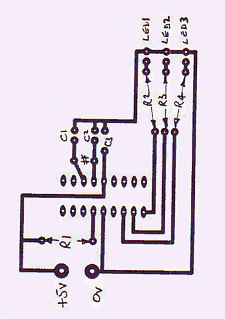
PCB full size as seen from the component side.
Lowb1
Nextb1
Return
Clr:for b1=0 to 7: low bl: next bl: return
The portB pins are placed in a register called bl. This could have been called b0, b2, b3 etc. there are, of course, only so many of these registers in each PIC.
The two statements :-
asm
and end asm
can be used at the begining and at the end of a section of assembly language you wish to insert into the midddle of a BASIC program.
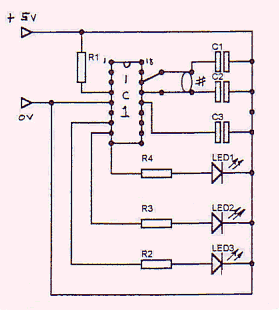
Below is the circuit diagram for the traffic light project.
List of components:-
          R1    4.K Resistor.............1
          R2
          R3
          R4    470R ....................2
          #     4Mhz crystal.............1
          C1
          C2    22pf capacitor...........2
          C3    0.1 Mf...................1
          LED1  Green LED................1
          LED2  Orange LED...............1
          LED3  Red LED..................1
          IC1   PIC 16C84................1
          PCB Pins.......................2
