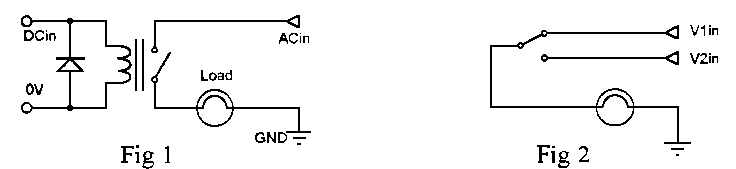
Fig. l is a simple diagram showing one of the most important aspects of relay design, namely, that the voltage controlling the operation of the relay contacts is completely isolated from the load voltage. A small DC current flowing through the coil causes an electromagnetic core to attract the contact arm, this closes the contacts and allows current to flow in the AC circuit, thus lighting the lamp. Since all coils are inductors, a DC coil will create a very high voltage spike at switch-off so a flywheel diode must always be connected as shown to clip this away. The diode must be a fast signal type like the 1N4148 and failure to fit one could damage any semiconductors in the same circuit. AC coils do not have a flywheel diode fitted for obvious reasons. The switched AC supply is connected to the contact as shown in the diagram and the load is wired between the pole and ground. This arrangement ensures that the load is always grounded when switched off and is a vital consideration. Wiring the load into the input line will make it live all the time and must NEVER be done. Now that we know the basics about connecting up our relay, the next stage is to look at the types of contacts used in different applications.
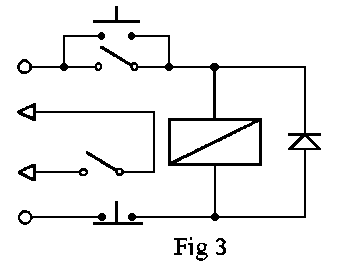
Fig. I has a single pole "make" contact (closed when energised) but Fig. 2 shows the single pole changeover version. This gives the choice of having the supply connected to either the normally open contact as before, or to the normally closed contact for switching off the lamp with the coil energised. In Fig. 2, the lamp runs on a lower voltage (VI) with the relay off, but switches to a higher voltage (V2) for more light when the relay is on. This arrangement can be used to drive a water pump intended to idle all the time, but switch to a higher pumping volume when the water level rises high enough to trigger a liquid level detector and switch on the relay. Fig. 3 is the basic arrangement for a latching relay. This is supplied through its own normally open contact and when the push-to-make switch across the contacts is closed momentarily, the relay switches on and maintains the supply after the switch has been released. A second push-to-break switch in the common rail breaks the circuit and switches the relay off again. With a second pair of contacts pulling in the load, a circuit like this is commonly used when only one switch position is
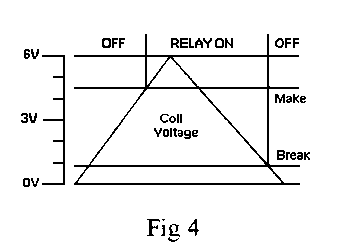
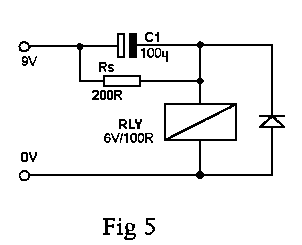
permitted to start a factory conveyor belt but operator stop switches have to be placed at several positions along the line. Both switches can be wired, in series, into the common rail to make wiring easier in a simpler application. A very important thing we must know about relays is that the contacts require more magnetic flux to initially close them at switch-on than they do to keep them closed. Fig. 4 shows that an increasing voltage across a 6V relay coil pulls in the contact arm at around 4V5 (make voltage) but is then able to maintain contact until the voltage falls to typically less than 1V0 (break or release voltage). The reason for this is that it takes more electromagnetic flux to pull in the contact arm when it is separated from the magnet, but far less when the arm is virtually touching it. The significant thing about this is that the resistance between the contacts is higher when the coil voltage is near to breaking because they are not so firmly pushed together. The will cause eventual deterioration of the contact material in high current applications so the rule is to switch rapidly and maintain the full coil voltage whenever the contacts are loaded near to their maximum. When high currents are not a consideration, we can employ the relay's on/off hysteresis in a number of very useful ways.
Fig. 5 shows a way of reducing the current consumed by a 6V relay coil without effecting its switching speed. The supply voltage is chosen to be 50% higher that the 6V nominal coil rating and a resistor twice the value of the coil is connected in series to reduce the final coil voltage to about half. This allows the relay to maintain good contact for moderate loads whilst consuming only half the nominal coil current. Now we need only connect C 1 across the series resistor to shunt enough current through the coil for the make operation. The full supply voltage will therefore appear across the coil at switch-on, but then rapidly decay to a lower holding voltage. C1 should be large enough to keep the coil above the make voltage for a period specified as the "make time". In most cases this will be, C = t / 1.1 X R, where "t" is the make time for the relay and R is the resistance of the coil. (See relay spec sheet for make time).
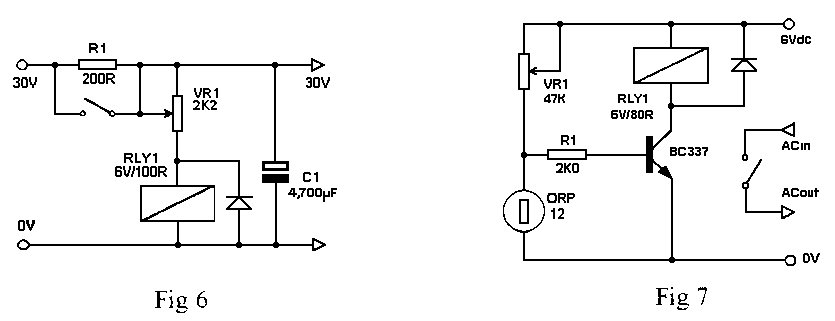
Fig. 6 is an anti-surge device used to protect rectifier diodes in power supplies which may have to work into large reservoir capacitors in the PSU smoothing circuit. Most rectifier diodes are capable of withstanding heavy momentary switch-on surges as current flows into these capacitors but it is wise to offer some sort of protection against overloads like this. The circuit works as follows. The relay is part of a voltage divider with VR1, and the latter is adjusted to develop the nominal 12 volts across the coil when the voltage across C 1 is equal to the raw 30V input. It will therefore be switched off and the contacts open at switch-on so R1, a 3W wirewound resistor, reduces the initial charge current to a safe level. When C1 has charged to around 25 volts, the make voltage (9V in this case) will appear across the coil and close the contacts. RI is therefore shorted and the full PSU current will be available from the output.
The final circuit of Fig. 7 is a small light activated switch that can be used to experiment with the ORP12 light dependant resistor (LDR). The ORP12 exhibits a low resistance in bright light, a very high resistance in total darkness, and varying resistance values in between. The voltage across the LDR will rise as the light on it falls so the transistor will pull an increasing current through the relay coil until it switches on. The light must then increase enough to reduce the coil voltage to the release level and switch it off again. VR1 is adjusted to switch the relay on at the desired level of shade or darkness. Increasing the value of RI widens the dark to light range for any setting at VR1.